Tuesday, 27 September 2022

Terrain - Ruins


Recently, I've been picking up the occasional issue of Imperium magazine when ever there's something space marine or terrain flavoured on the front. As such, I've built up a small pile of terrain sprus that needed assembling and painting. In one pile I have 5 sprus of Ryza ruins, which I have now assembled and begun painting. Here's the first half completed. I have 3 larger buildings yet to finish. Altogether, these ruins will give me a good 4x4 table of terrain to use in games of 40k and Grimdark Futures. 


I chose a greenish ochre colour to base them with then set about adding random patches of Snakebite Leather contrast using the airbrush. 


I then picked out tubing using the new Black Legion contrast paint and picked out some brass areas too. I dry brushed the whole thing with Pale Sand and picked out some silver metallic areas using a drybrush. Then I began weathering. 


Weathering consisted of applying patina to the brass areas and rust weathering powders to the more metallic areas. I picked out some details such as wires, skulls and screens etc... to break up the colour and add some 'wow' details. I don't think you need to do this with every wire. Just a few here and there helps the terrain pop without it being a burdensome task or visually overwhelming. 

I finished by adding some lighting glow and some scorch marks around the edges using the airbrush. Overall, I'm not too happy with the lighting glow but apart from that they have turned out well so far. I think I'll have another go at the lighting once I've painted the remaining buildings.


 These ruins will go nicely with the pipes and reactor shown in this picture I think. Taken together I should have quite a nice table of terrain. 


Tuesday, 26 July 2022

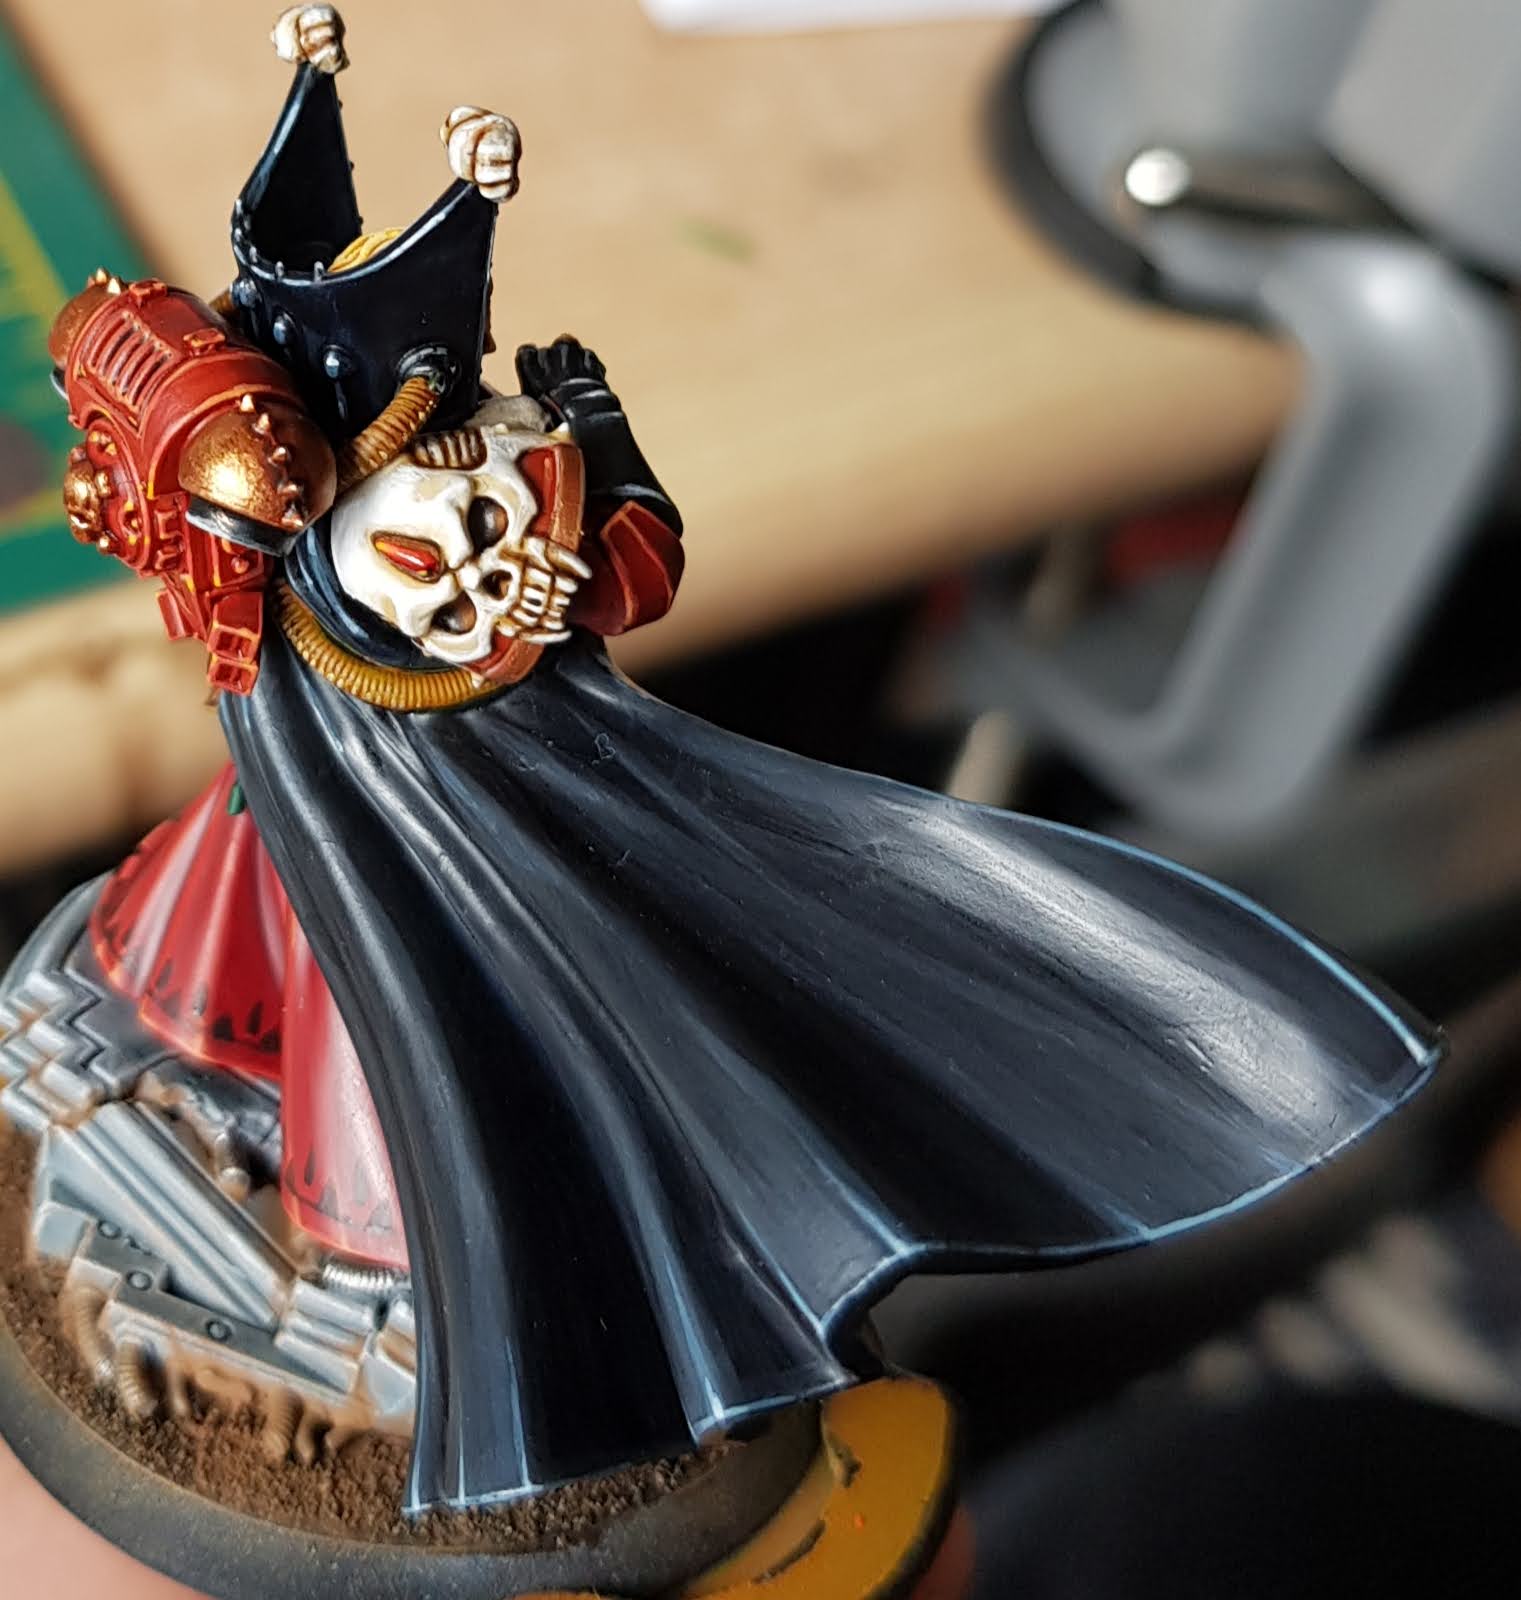
Blood Angels: Mephiston the Lord of Death


Recently, my graduating cohort of trainee teachers gifted me with a £25 GW voucher. There wasn't anything Ork shaped that I had my eye on so I decided to use it to get Mephiston for £1! Ordinarily, I wouldn't spend such a ridiculous price for a single plastic miniature (£26) but the voucher was basically free money so it seemed a sensible idea. 


Anyway, Mephiston is an excellent miniature and I had a great time painting him. There are a lot of soft materials present (capes and robes etc...) so I worked hard to develop my skills around wet blending and glazing to get the smooth transitions in the cloth. I agonised over the free hand details on the robes but decided to give it a go in the end. I'm glad I did because I think the model might have been a tad dull otherwise. The glowing eyes also came off better than my previous attempts at glowing effects so that's good too. 


These images are not of the complete model. All that was left to do at this point was add some grass tufts and paint the edge of the base. Onwards and upwards.


Monday, 25 April 2022

Blood Angels: Death Company


I have been able to pick up another 10 snap-fit Primaris marines from eBay for a reasonable price to bolster the original 5 I had painted. This left me with 5 spare so I decided to build and paint them as death company members.


It was a nice painting challenge as I've never been all that confident painting black. I decided to highlight the armour using cool blues and greys as a contrast to the warm reds and oranges of their less deranged brothers. Hopefully, this allows them to stand out a bit from the others, which is something that the death company have always done in Blood Angel armies. 


Only one has been completed so far, with another 2 almost complete. I'll paint all 5 backpacks at the end, which is why it is missing. Overall, I'm quite pleased with how this one turned out and I'm looking forward to eventually having a full squad charging around causing mayhem! 


Wednesday, 30 March 2022

Blood Angels: Second Company

I have recently been keeping half an eye out for useful issues of Imperium magazine, which my local Forbidden Planet store stocks. By 'useful' I am referring to any issues with Primaris Space Marines on the front! 

Recently, my son was born and so I came up with the idea of starting a little collection for him that I can build and work on over time. When he's old enough, he'll have his own army that he can begin using right away. My own dad did something similar for me when I was younger when he made me a train set and also helped me with painting my Airfix aircraft models. 


Anyway, I love the Blood Angels painting scheme so I've also used this as an excuse to really push myself and learn some new painting techniques. I present to you some examples of a small squad of assault intercessors that have now been completed.


I've been using contrasts, washes and blends to get the smooth transitions of colour on the armour, which is then sharpened with extreme edge highlighting. I really pushed myself on the sword, which was wet blended. This was a really useful technique to learn and I'm really pleased with the results. 

I love the clean, uncluttered look of the Primaris marines. I think Space Marines became far too busy with trinkets and details etc... Blood Angels were amongst the worst offenders for this! These new Primaris marines have allowed me to go right back to the original 2nd Edition colour schemes so I have tried to be faithful to these (including the squad markings). The heraldry on the models is a new addition, which is giving me an opportunity to get creative without adding loads of fussy trinkets. 


I've completed this squad of five now and have recently moved on to a Lieutenant. Hopefully, he'll be competed soon! 

Tuesday, 18 January 2022

Ork Scrap Fort!


A while ago I backed a Kickstarter campaign run by Fogu Models for their Fort of Hardknox terrain. It immediately inspired me at the time to use it as an Ork fort and made me think about the Boss HQ building in Dawn of War and also the old card Gorkamorka fort. I had to have one so I backed the campaign. Now, several years later, I have finally gotten round to putting together and painting the piece. 


The airbrush has been a major help in painting the large surface area consistently and relatively quickly. I opted for a 'Goff light' scheme to fit with my current Ork army theme. I didn't go overboard on the ork details though (hence the 'light') so that it could still be used as a gang fort in the future should I wish. I also kept the weathering to a minimum to maintain the simple colour scheme. Rust orange was used as a spot colour liberally to break up the generally flat black scheme.


Overall, the kit is fantastic quality with very few of the imperfections you'd usually expect from resin scenery. It's also a good size and doesn't overly dominate the board. I plan on expanding my terrain collection to accompany this fort to include more scrap buildings. Perhaps I'll be further inspired by the base buildings in Dawn of War. Who knows?   

Friday, 1 May 2020

Void 1.1: Viridian Shock Marines

Viridia does not look kindly on rowdy separatist upstarts. For this reason, Viridia maintains a number of quick reaction task forces on full alert with a brief to respond quickly to separatist threats.

Considering the fun I've been having painting separatist forces, I thought it prudent to build a task force to fight them. Luckily, I have a reasonable collection of unpainted 'power armoured' marines from the 'Shock' and 'Assault' variety as well as a character and some support platforms.

I have begun with a small unit of shock marines. I wanted the paint scheme for all power armoured figures to reflect the original artwork of a Shock Marine that featured on the front of the purple rule book. As you can see this is a clean white with bluish tones. This gave me the idea to search for tutorials on painting White Scars Space Marines to give me guidance.

They were paint stripped first using acetone based nail varnish remover and based with Airfix bright white spray paint. I then followed this very handy guide by Juan Hidalgo using a combination of contrast paints and Vallejo game colours. I chose to use Iyanden yellow contrast paint for the vibro scythes, which I highlighted up with pale yellow and white.

Overall, I'm very pleased with the colour scheme and I am impressed with the contrast paint effects. I shall continue to adapt my painting style to accommodate more contrast paint techniques, but for now I'm happy to paint a few more power armour units in this scheme. 


Monday, 20 April 2020

Void 1.1: Lt Mick Krainer

Initially, this marine isolation project was mainly an excuse to dust off some ancient models and get them up to scratch. However, I must admit that as I have now completed all of the marine units I own, I found myself enjoying the project so much that I wanted to continue. So, I treated myself to this Kurt Kwinsky miniature from Scotia Grendel to act as a Lieutenant character for the separatist forces.

I painted him up in exactly the same way as the other marines and I think he fits into character of the force very well. Game-wise, I shall be altering his stats slightly to give him a bit more impact on the table. I'll mainly be giving him a few more wounds and allowing him to join marines units rather than commando units. To reflect his new profile I've named him Lt Mick Krainer. I'm sure he'll lead the men admirably.

To keep up my momentum, I'm hoping to pick up another marine unit and another mounted chain gun team to round off the force. 

Saturday, 11 April 2020

Void 1.1 Behemoth Fire Support

My wife an I got married last summer and my dad very generously gave me an airbrush as a gift. It was exactly what I had wanted for years, an Iwata Revolution CR. Unfortunately, I've been so busy with the house and life generally that I had not had time to sit down and devote a day to research, practise and tuition. In isolation, however, no such excuses exist so I sat down and spent a morning researching the use and clean-up procedure of airbrush painting. Later, I practised on an old Viridian Behemoth Fire Support dinosaur that I was considering including in my separatist marine forces.

The airbrush itself is great. I based it a goblin green colour then added streaks in a dark olive colour. I used the streaks as an opportunity to to practise making wider lines thin and getting used
to the trigger action and pressure. Airbrushing is difficult but I can see a lot of potential in it and I really like how the dinosaur's skin tone came out. The rest of the model was painted in the same way as the previous marines with particular reference to the mounted chain gun team. I opted for a WW2 US tank inspired scheme for the howdah but refrained from adding all the dust and rust that I would normally add to a vehicle. I wanted to keep it similar to the clean, sharp highlighting style of the original.

Regarding the Behemoth itself, I'm pleased overall with the results. The problem for me is the silliness of the unit. I just can't get over the obvious limitations to using dinosaurs instead of vehicles. Regardless, it is certainly different and makes a nice centre piece for my marine separatist forces. I suppose they defected from Viridia and continued to maintain their stocks of Behemoth dinosaurs.

I have the troop transport version too but that really is daft! I may or may not use it. We'll see.


Tuesday, 31 March 2020

Void 1.1 Marines

Unfortunately, my wife and I both came down with Corona virus 2 weeks ago and boy oh boy was is terrible. Luckily, we're both ok now which means that I've had a lot of time to catch up on a few painting products that I've been thinking about for a while now.

First up are some marine models for the defunct game Void 1.1. I've been thinking about stripping my original colour scheme (circa 2000!) and bringing them right up to date. The models themselves are great and have a really nice generic 'space marine corps' feel that fits really nicely with settings like Aliens or Starship Troopers. In regards to Void, I've had the idea of painting up a small force of 'marine' units to act as colonial separatists fighting for independence from Viridia. To counter the separatists, I have a few units of power armoured marines that could act as a task force sent by Viridia to bring them back into line. So to that end, I have 2 small projects to finish. 

So I set about paint stripping a squad of 6 marines, 2x mortar teams and a mounted chain gun team. I wanted to keep the paint scheme clean and crisp like the original catalogue models back in 2000 but update the uniform to be more realistic. Therefore, I painted them in WW2 marine green fatigues but kept the classic white t-shirts and black rifles. I used a few contrast paints for the base colours of these miniatures. I'm only really beginning to learn how to use them properly.

So far I have completed the squad of marines, 1 mortar team and the chain gun team. That leaves a second mortar team left to paint. I hope to round this force off with a second squad of marines and perhaps vehicle. We shall see.


Sunday, 2 February 2020

Zone Mortalis Terrain for Necromunda: Doors


To add more utility to my Zone Mortalis terrain from Art of War Studios, I decided to purchase some of their single and double doors. My friend and I have been playing plenty of games recently and we've found opening and closing doors, particularly the double doors from GW, quite difficult. These doors seemed like a good answer, since you simply slide the door out from the top once opened. No fuss. 


I added rivet detail to them in exactly the same way as I did the walls and painted them to match. With the doors, I didn't like the laser etched pattern so opted to paint a simple chevron pattern over the flat surface sides instead. I think it gives it a more 'sliding shutter' look. I also added some graffiti decals from Warlord game's Dredd range. I think they were free in a copy of Wargames Illustrated. They fit the bill anyway.


Overall I really recommend the Hive Terrain products from Art of War Studios. It's a little pricier than TTcombat and others, but I honestly prefer the aesthetic and they are a joy to put together.   


Tuesday, 31 December 2019

Zone Mortalis Terrain for Necromunda - Art of War Studios


It's been almost a full 12 months since my last post and frankly, that's a shame. I have, in fact, done a fair amount of hobby in the time. It's just that the access of social media has meant that I've become more of a lurker on other pages than a content creator on my blog. Well, I've taken the brave decision to improve my life my removing all social media apps off my phone. No more idle passivity for me.

Hopefully, this means I will document my hobby a little more on these pages as a record to myself rather than as a means of acquiring praise and recognition from others on social media. So to begin that process, I shall attempt to document the beginning of my new Necromunda Dominion campaign. Kicking off the process, I present the Zone Mortalis terrain that I have finally finished.


I purchased these walls from Art of War Studios a little over a year ago and it has taken me until now to finish them. Honestly, I thought it would be a simple job of assembly, spray silver, oil wash, drybrush rust and varnish. Put the kettle on and organise a game. Oddly, the process shook out more or less exactly like that except for one extra step. In between 'assembly' and 'silver spray', I decided to add extra texture detail to every section by applying 2mm half spheres as rivets. This step took a significant toll on my time and sanity, which resulted in a huge delay.


Regardless, I persevered and I think the extra texture really improves the look of each section. MDF terrain, in my opinion, suffers from a lack of surface texture, which makes it look 'Lego-ee'. Adding the rivets has given each section more 3D elements to help break up the flatness and enhance the overall industrial theme. I do not regret this step, but boy oh boy was it tedious. 

More recently, Father Christmas (who's Santa?) brought me a pack of broken wall section from Art of War Studios to round off the set. I enhanced these with exposed piping, wiring, steel supports and rubble using bits from my box. Polyfiller did the rest!


Regarding the painting process, I first applied a base of boltgun metal spray from GW. Then I glued on the chevrons, which I printed on paper with a laser copier. I sealed the chevrons with clear varnish then proceeded to apply an oil wash of black followed by burnt umber using a spray bottle. Once dry, I sealed with clear varnish and began drybrushing. Using a large brush, I applied Ryza rust in random patches at random colour depths across each section. Then I sponged on random patches of Typhus corrosion. Next, I carefully applied Nihiakh oxide around rivets and panels etc... This final colour step is really important because it adds some much needed colour to what is essentially a very dark and rusty structure. Finally, I sponged on a small amount of 'Blood for the Blood God' here and there to add yet more bright colour to an otherwise dull affair.

As an additional finishing touch, I think I'll add some posters and signs to give it that lived in feel! Let's see how it pans out.